本教程带大家初步了解编辑器并且做进一步延伸的探讨。
开篇语
本篇教程适用于未使用过U3D编辑器的初学者以及对编辑器有一定了解的同学进阶。希望能在你成长的路上帮助到你。
本章主要技术点
1.Rect
2.GUI && EditorGUI
3.EditorUtility
4.EditorWindow
Rect
我们通常在untiy window中使用rect表示UI坐标与相对坐标。需要注意的是此处的x/y是相对于零点坐标的偏移
1
2
3
4
5
6
7
8
9
10
| public void OnGUI ()
{
Rect r = new Rect ();
r.position = Vector2.zero;
r.width = 100;
r.height = 100;
r.x = 50;
r.y = 50;
GUI.Label (r, "test");
}
|
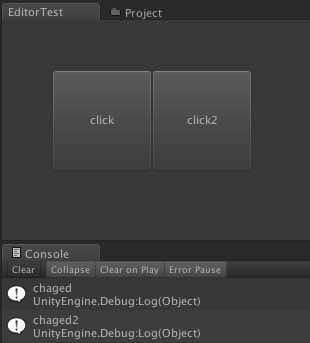
GUI && EditorGUI
我们通常用GUI做显示,下图展示了本质上两种GUI的用法的一致性。
1
2
3
4
5
6
7
8
9
10
11
12
13
14
15
16
17
18
19
20
21
22
23
| Rect r = new Rect ();
r.position = Vector2.zero;
r.width = 100;
r.height = 100;
r.x = 50;
r.y = 50;
Rect r2 = new Rect ();
r2.position = Vector2.zero;
r2.width = 100;
r2.height = 100;
r2.x = 150;
r2.y = 50;
GUI.changed = false;
GUI.Button (r, "click");
if (GUI.changed)
Debug.Log ("chaged");
EditorGUI.BeginChangeCheck ();
GUI.Button (r2, "click2");
if (EditorGUI.EndChangeCheck ())
Debug.Log ("chaged2");
|
扩展:自己实现IGUI
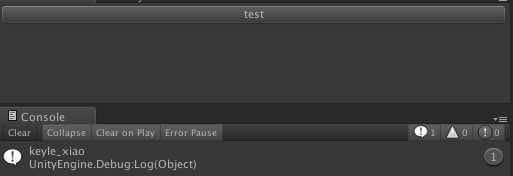
简单实现一个Button就是那么简单,你甚至可以自定义一个全新的控件
1
2
3
4
5
6
7
8
9
10
11
12
13
14
15
16
17
18
19
20
21
22
23
24
25
26
27
28
29
30
31
32
|
public class GUIButton : IGUI
{
public GUIButton (string content, System.Action ac)
{
label.text = content;
Clicked = ac;
}
public GUIContent label = new GUIContent ();
public event System.Action Clicked;
public void OnGUI ()
{
if (GUILayout.Button (label) && Clicked != null)
Clicked ();
}
}
public class EditorTest:EditorWindow{
GUIButton b = new GUIButton ("test", () => {
Debug.Log ("keyle_xiao");
});
public void OnGUI ()
{
b.OnGUI ();
}
}
|
GUILayout && EditorGUILayout
我们通常使用GUILayout来进行界面的布局,理解比较简单 通过beginxx … endxx 代码 实现类型排列的布局。如果非要说这两者有何不同,一个时属于引擎的组建一个是属于编辑器的部分。两者都是UI的subset。
EditorUtility
关于EditorUtility这种XXXXUtility结尾的类有非常多的话题可以聊,这是U3D引擎提供的一些快捷类,帮助我们快速获取或设置一些属性等等。这里我们简单介绍下EditorUtility。
未完成 待续
相关链接
Rect的文档在这里 http://docs.unity3d.com/ScriptReference/Rect.html
自己封装IGUI可参考 http://answers.unity3d.com/questions/601131/editorgui-editorguilayout-gui-guilayout-pshhh-when.html
本文标题:编辑器扩展与进阶
文章作者:Keyle
发布时间:2016-03-23
最后更新:2024-08-20
原始链接:https://vrast.cn/posts/1bb36a9b/
版权声明:©Keyle's Blog. 本站采用署名-非商业性使用-相同方式共享 4.0 国际进行许可