这个系列是我阅读 UNITY5.X AI PROGRAMMING COOKBOOK 的笔记。有好又坏 请酌情阅读,有不当之处还请指出。
本章主要概述让 AI 更智能的移动。对应到原书也就是第一章节。
使AI移动 这三个类的工作如下。
Agent负责 计算当前帧的移动与下一帧的移动。
AgentBehaviour负责抽象Steering的计算过程。
Steering包含了Agent需要计算的数据。
每当需要扩展一个新的移动行为,则只需要增加一个 AgentBehaviour 类型的派生即可。
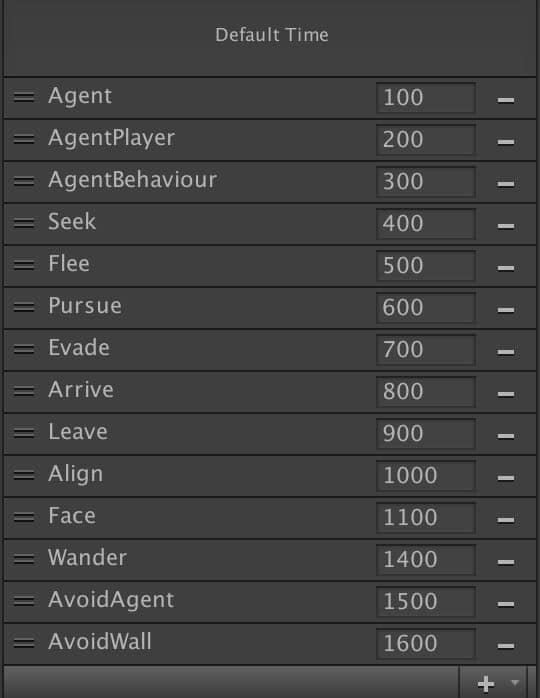
脚本时序
基础结构
这里详细介绍了利用 Agent/AgentBehaviour/Steering 三个类进行基础的 AI 结构搭建。当然代码里有一些 Bad Smell ,比如 Steering 类的 new ,每个行为返回一个Steering毫无例外的都会new一次。当然这完全是可以规避的,这里并不作代码优化的讨论 所以只是提到。
Agent 代理 Agent 通过 Update 与 LateUpdate 来计算当前帧与下一帧的移动速度角度。
Update :执行当前帧的物体的移动与角度
LateUpdate :计算下一帧的物体的移动与角度数值
1
2
3
4
5
6
7
8
9
10
11
12
13
14
15
16
17
18
19
20
21
22
23
24
25
26
27
28
29
30
31
32
33
34
35
36
37
38
39
40
41
42
43
44
45
46
47
48
49
50
51
52
53
54
55
56
using UnityEngine;using System.Collections;public class Agent : MonoBehaviour { public float maxSpeed; public float maxAccel; public float orientation; public float rotation; public Vector3 velocity; protected Steering steering; void Start () { velocity = Vector3.zero; steering = new Steering(); } public void SetSteering (Steering steering ) { this .steering = steering; } public virtual void Update () { Vector3 displacement = velocity * Time.deltaTime; orientation += rotation * Time.deltaTime; if (orientation < 0.0f ) orientation += 360.0f ; else if (orientation > 360.0f ) orientation -= 360.0f ; transform.Translate(displacement, Space.World); transform.rotation = new Quaternion(); transform.Rotate(Vector3.up, orientation); } public virtual void LateUpdate () { velocity += steering.linear * Time.deltaTime; rotation += steering.angular * Time.deltaTime; if (velocity.magnitude > maxSpeed) { velocity.Normalize(); velocity = velocity * maxSpeed; } if (steering.angular == 0.0f ) { rotation = 0.0f ; } if (steering.linear.sqrMagnitude == 0.0f ) { velocity = Vector3.zero; } steering = new Steering(); } }
Steering 数据载体 Steering 承载了代理(Agent)需要计算的原始数据。数据的表现直接会影响到计算的AgentBehaviour / Agent 的计算结果。
1
2
3
4
5
6
7
8
9
10
11
12
using UnityEngine;using System.Collections;public class Steering { public float angular; public Vector3 linear; public Steering () { angular = 0.0f ; linear = new Vector3(); } }
AgentBehaviour 代理行为 由于 gentBehaviour 是Agent的数据提供方。所以他主要的职责就是派生与扩展。
1
2
3
4
5
6
7
8
9
10
11
12
13
14
15
16
17
18
19
using UnityEngine;using System.Collections;public class AgentBehaviour : MonoBehaviour { public GameObject target; protected Agent agent; public virtual void Awake () { agent = gameObject.GetComponent<Agent>(); } public virtual void Update () { agent.SetSteering(GetSteering()); } public virtual Steering GetSteering () { return new Steering(); } }
更加智能的移动 Seek 搜索 上面说到 AgentBehaviour 代理行为,是可以派生的。我们可以直接重写其 GetSteering 函数,来增加不同的表现。
获取朝向目标的向量
目标朝向目标的向量归一化,乘以当前速度。也就是获得了 朝向目标的速度的向量。
1
2
3
4
5
6
7
8
9
10
11
12
13
14
using UnityEngine;using System.Collections;public class Seek : AgentBehaviour { public override Steering GetSteering () { Steering steering = new Steering(); steering.linear = target.transform.position - transform.position; steering.linear.Normalize(); steering.linear = steering.linear * agent.maxAccel; return steering; } }
Purse 追逐 在 GetSteering() 函数中有这样的逻辑存在。
通过 speed <= distance / maxPrediction
speed :为当前追踪的物体真实速度。
distance :为当前追踪的物体一共走过的距离。
maxPrediction :预设的预测时间。
这样可以大胆猜测 为当前追踪的物体 正处于匀速 或者 加速中
distance / maxPrediction 我们最终得到的 速度 就是物体的 预测速度。我们拿着 预测速度 与 speed 做一个比较。如果预测的速度小于真实速度,那么这个预测值出乎意料的错误。我们需要重新计算一个更真实合理的预测值。prediction = distance / speed; 这里计算了一个中规中矩的预测值。targetAgent.velocity * prediction 获取 预测时间 内运动的距离。
对于刚才的猜测结果,有一种条件下是有问题的,那就是当 当前追踪的物体 突然静止/或者本身就是静止的。由于脚本执行的时序问题,追逐到物体的时候会直接穿插过去(追过头了),然后接着反复运动。这里就要用到 Arraying 脚本了,后文就会介绍到。
1
2
3
4
5
6
7
8
9
10
11
12
13
14
15
16
17
18
19
20
21
22
23
24
25
26
27
28
29
30
31
32
33
34
35
public class Pursue : Seek { public float maxPrediction; private GameObject targetAux; private Agent targetAgent; public override void Awake () { base .Awake(); targetAgent = target.GetComponent<Agent>(); targetAux = target; target = new GameObject(); } void OnDestroy () { Destroy(targetAux); } public override Steering GetSteering () { Vector3 direction = targetAux.transform.position - transform.position; float distance = direction.magnitude; float speed = agent.velocity.magnitude; float prediction; if (speed <= distance / maxPrediction) prediction = maxPrediction; else prediction = distance / speed; target.transform.position = targetAux.transform.position; target.transform.position += targetAgent.velocity * prediction; return base .GetSteering(); } }
Flee 逃离 顾名思义 Flee 肯定和 Seek 相反。事实也正是如此,获取了与目标相反方向的速度的向量。
1
2
3
4
5
6
7
8
9
10
11
12
13
using UnityEngine;using System.Collections;public class Flee : AgentBehaviour { public override Steering GetSteering () { Steering steering = new Steering(); steering.linear = transform.position - target.transform.position; steering.linear.Normalize(); steering.linear = steering.linear * agent.maxAccel; return steering; } }
Evade 规避 规避(Evade) 代码与 Pursue 代码一致。在 Flee/Seek 层,二者做了区分。
1
2
3
4
5
6
7
8
9
10
11
12
13
14
15
16
17
18
19
20
21
22
23
24
25
26
27
28
29
30
31
32
33
34
35
36
37
38
39
40
41
using UnityEngine;using System.Collections;public class Evade : Flee { public float maxPrediction; private GameObject targetAux; private Agent targetAgent; public override void Awake () { base .Awake(); targetAgent = target.GetComponent<Agent>(); targetAux = target; target = new GameObject(); } public override Steering GetSteering () { Vector3 direction = targetAux.transform.position - transform.position; float distance = direction.magnitude; float speed = agent.velocity.magnitude; float prediction; if (speed <= distance / maxPrediction) prediction = maxPrediction; else prediction = distance / speed; target.transform.position = targetAux.transform.position; target.transform.position += targetAgent.velocity * prediction; return base .GetSteering(); } void OnDestroy () { Destroy(targetAux); } }
本篇到此结束,本文主要介绍了 AI 行为的基础结构 与 其何如派生出来行为。下一篇会着重介绍派生出的其他行为与详细算法(实现)。
本文标题: AI Design 1
文章作者: Keyle
发布时间: 2017-03-01
最后更新: 2024-08-20
原始链接: https://vrast.cn/posts/d1301104/
版权声明: ©Keyle's Blog. 本站采用署名-非商业性使用-相同方式共享 4.0 国际进行许可
