今天凌晨开始写这篇文章,想写这个主题很久了。相信每个资深开发都经历过每次公司要发版本之前都会有一堆bug闪现。真让人苦恼。很高兴 Unity technology 于 今年的六一儿童节更新了自动化测试的特性。这下终于不用再导入第三方自动化测试插件了。当然本章节会相对完整的快速概述其重要部分。如果你还想知道更多, Unity3D 已经提供了比较完善的文档

适用于多种平台的自动化测试

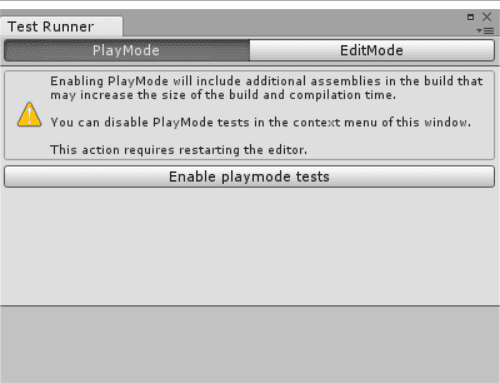
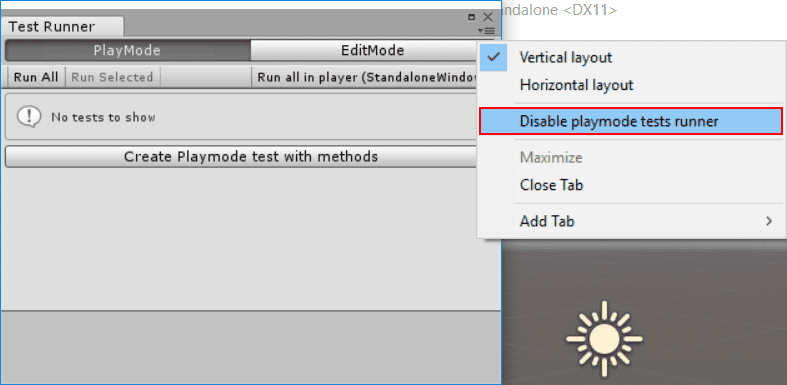
TestRunner 适用于 Standalone, Android, or iOS 等平台。你可以在 Window > Test Runner 找到此项功能。

TestRunner 使用了Unity一体化的单元测试库。开源的.net语言库。更多的信息在 nunit 官网NUnit GitHub文档.

UnityTestAttribute是Unity Test Runner的标准NUnit库的主要补充。 这是一种单元测试,允许您从测试中跳过框架(允许后台任务完成)。 当以编辑模式运行时,以Play模式运行并在EditorApplication.update回调循环中执行UnityTestAttribute作为协同程序。

已知问题和限制

以下是Unity Test Runner的已知问题和局限性:

WebGL和WSA平台不支持UnityTestAttribute。
测试运行者目前不支持AOT平台。
UnityTest不支持参数化测试(ValueSource除外)。
在命令行运行的平台播放器(例如Standalone,Android或iOS)中的自动测试目前不受支持。
在进行EditMode测试时,您必须创建一个文件夹名称编辑器来存储它们。

面板参数

开启与关闭测试

演示

Test 与 UnityTest 特性

在编辑器或者运行状态下都可以使用Test

1
2
3
4
5
6
[Test]
public void GameObject_CreatedWithGiven_WillHaveTheName()
{
var go = new GameObject("MyGameObject");
Assert.AreEqual(“MyGameObject”, go.name);
}

在运行状态下使用UnityTest

1
2
3
4
5
6
7
8
9
10
11
[UnityTest]
public IEnumerator GameObject_WithRigidBody_WillBeAffectedByPhysics()
{
var go = new GameObject();
go.AddComponent<Rigidbody>();
var originalPosition = go.transform.position.y;

yield return new WaitForFixedUpdate();

Assert.AreNotEqual(originalPosition, go.transform.position.y);
}

在编辑器下使用

1
2
3
4
5
6
7
8
9
10
11
12
[UnityTest]
public IEnumerator EditorUtility_WhenExecuted_ReturnsSuccess()
{
var utility = RunEditorUtilityInTheBackgroud();

while (utility.isRunning)
{
yield return null;
}

Assert.IsTrue(utility.isSuccess);
}

UnityPlatform 特性

该特性可以帮助你区分测试的平台

1
2
3
4
5
6
7
8
9
10
11
12
13
[Test]
[UnityPlatform (RuntimePlatform.WindowsPlayer)]
public void TestMethod1()
{
Assert.AreEqual(Application.platform, RuntimePlatform.WindowsPlayer);
}

[Test]
[UnityPlatform(exclude = new[] {RuntimePlatform.WindowsEditor })]
public void TestMethod2()
{
Assert.AreNotEqual(Application.platform, RuntimePlatform.WindowsEditor);
}

PrebuildSetup

如果您需要在测试开始之前执行任何额外的设置,请使用PrebuildSetupAttribute。 为此,请指定实现IPrebuildSetup接口的类类型。 如果您需要运行整个类的设置代码(例如,如果您想在测试开始之前执行一些代码,例如特定测试所需的资源准备或设置),请在类中实现IPrebuildSetup接口以进行测试。

只需要继承 IPrebuildSetup 接口 并且 标记 PrebuildSetup 特性就能提前配置单元测试所需数据或者资源。

1
2
3
4
5
6
7
8
9
10
11
12
13
14
15
public class TestsWithPrebuildStep : IPrebuildSetup
{
public void Setup()
{
// Run this code before the tests are executed
}

[Test]
//PrebuildSetupAttribute can be skipped because it's implemented in the same class
[PrebuildSetup(typeof(TestsWithPrebuildStep))]
public void Test()
{
(...)
}
}

在进入播放模式或建立播放器之前,执行PrebuildSetup代码。 安装程序可以使用UnityEditor命名空间及其功能,但为了避免编译错误,您必须将其放置在“editor”文件夹中,或者必须使用#if UNITY_EDITOR指令进行保护。

LogAssert Log断言

如果记录除常规日志或警告消息之外的其他消息,则测试将失败。 使用LogAssert类在日志中预期消息,并防止测试失败。
如果预期的消息没有出现,测试也报告失败。 如果任何常规的日志或警告消息不出现,测试也失败。

1
2
3
4
5
6
7
8
9
10
11
12
13
[Test]
public void LogAssertExample()
{
//Expect a regular log message
LogAssert.Expect(LogType.Log, "Log message");
//A log message is expected so without the following line
//the test would fail
Debug.Log("Log message");
//An error log is printed
Debug.LogError("Error message");
//Without expecting an error log, the test would fail
LogAssert.Expect(LogType.Error, "Error message");
}

MonoBehaviourTest Mono脚本测试

MonoBehaviourTest是编写MonoBehaviour测试的包装,也是一个协程。 从UnityTest中产生MonoBehaviourTest来实例化指定的MonoBehaviour并等待它完成执行。 实现IMonoBehaviourTest接口来指示测试完成的时间。

1
2
3
4
5
6
7
8
9
10
11
12
13
14
15
16
17
18
19
[UnityTest]
public IEnumerator MonoBehaviourTest_Works()
{
yield return new MonoBehaviourTest<MyMonoBehaviourTest>();
}

public class MyMonoBehaviourTest : MonoBehaviour, IMonoBehaviourTest
{
private int frameCount;
public bool IsTestFinished
{
get { return frameCount > 10; }
}

void Update()
{
frameCount++;
}
}

Tips

  1. 所有标记 UnityTestAttribute 特性的方法 测试的时候就像是协同程序一样被执行。
  2. 待续 。